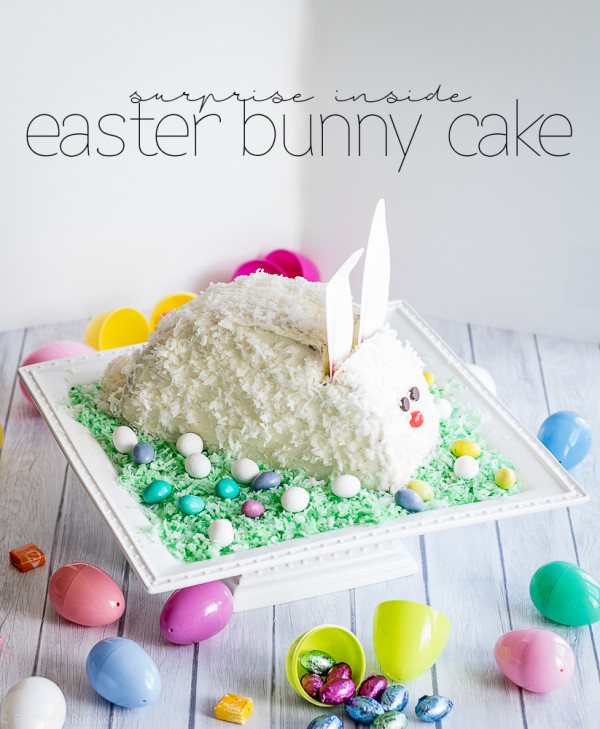
Surprise Inside Easter Bunny Cake
Recipe by The Honey Blonde
Visit websiteI mentioned on Monday how much I miss celebrating Easter like I did when I was a kid. I don't know about you, but Easter at my house was so much fun! Easter Bunny paw prints would magically appear (our neighbor would stamp them on in flour) on my front steps. My parents would surprise me with a Easter basket filled with candy and toys. And I would wrap up my day with an Easter Egg hunt at best friend's house. My other favorite part about Easter was making this Easter Bunny cake with my mom every year. We would buy a box of cake mix and a jar of frosting and make our Easter bunny cake. It was easy enough for me to help my mom with even when I was pretty young (she did all the hard work), but I felt like such an accomplished baker once our cake had morphed into a bunny! Even though I have since outgrown the Easter basket and Easter egg hunt (I would argue that I can never outgrow those things), I still make this Easter Bunny cake as often as I can. But this year I decided to mix things up a bit and add a little surprise inside. It all starts with one big layer of cake. It can be any flavor you like, but I prefer simple white cake (and I add some lemon and vanilla to make it taste less "boxy"). Yes, I used box cake mix. It's simple, easy, and cheap. And for a cake like this, I don't think it's worth it to make my own cake from scratch. You may feel differently, so do what you wish. Anyways, where was I? The box instructs to make 2 layers of cake, but instead I made one thick one. Once it was baked, cooled, and leveled, I cut it in half right down the middle. I did a little measuring to make sure I was right in the center. I then used a small knife to cut around the inside of the cake, leaving about a 1.5" margin, only cutting a quarter of the way into the cake. I then used a spoon to scoop out the cake from the center. I did this to both halves of cake. A quick tip, it is so much easier to cut the cake when it has chilled. I keep it in the freezer until I'm ready to go. I should also mention at this point that even though I didn't make the cake from scratch, I did make the frosting (I know ,I don't make any sense. Why would I make my own frosting, but not my own cake mix? Answer: because I don't like the taste of the store-bought kind). But again, do what you like and what makes you happy. So I piped a bit of the frosting on 1 of the halves around the part of cake that I didn't cut out and filled the center with Easter egg M&Ms. I then took the other half of cake and pressed it firmly on top, sandwiching the M&Ms inside. Now that the cake is in a half circle, I placed it on it's flat side and cut a wedge about a third of the way up one side, taking care not to eat the wedge because I will need that later (this requires lots of self control!). I then lightly frosted the cake with a crumb coat and poped it in the fridge to set for about 10 minutes. Then I frosted it one more time and patted shredded coconut into the freshly applied frosting to make the bunny's fur! To decorate the cake and really make it look like a bunny, I first dyed some of the shredded coconut green and placed it on a cake stand. Next, I put two chocolate chips and a pink jelly bean on the face to make eyes and a nose. Then I cut out two floppy ears in white construction paper and stick them in the front of the wedge that we cut out. To make the tail, I use the scraps from that wedge, "folding" it in half so that one layer is stacked on top, frosted it with more icing and topped with some extra coconut. For extra flair, I used some mini Cadbury eggs and M&M eggs to dress up the "grass". And there you have it! The classic Easter Bunny cake. How cute is this? It may not be the fanciest Easter cake, but it is so much fun and perfect for kids of all ages (even those of us who are 30). This is definitely one of my favorite things about Easter. It is as much fun to make as it is to eat. And speaking of fun... When you cut inside, out fall even more Easter eggs!! Who wouldn't want a slice of this Easter Bunny? Does your family make an Easter Bunny cake every year, too? Hope you all have a wonderful Easter!
Total time
0 minutes
Courses
Ingredients
- 1 box white cake mix
- 2 eggs (or as many as box directs)
- ⅓ cup butter (melted)
- ¼ cup water (as as much as box directs)
- zest of lemon
- 1 tsp vanilla
- 1 cup butter (softened)
- 3 cups powdered sugar
- 1 tsp vanilla
- shredded coconut
- jelly beans, m&ms, mini Cadbury eggs, chocolate chips
- white construction paper.